🇫🇷 Lire en Français | 🇪🇸Leer en Español | 🇧🇷Leia em português
Every breeder remembers the first time a newborn didn’t cry. I remember standing in a whelping room at 2 a.m. beside a breeder I’d been consulting with for years. The delivery was smooth. The puppy arrived. And then—silence. Her hands went straight to the bulb syringe, just as I had taught her. Just as I had been taught myself. But new research tells us that reaching for the bulb syringe first may actually delay the one thing that newborn needed most: air in its lungs. The July 2025 RECOVER guidelines have changed neonatal resuscitation. Some of what you’ll read here contradicts what I used to teach. But the science is clear, and you deserve to know what’s changed.
TL;DR: Key Takeaways
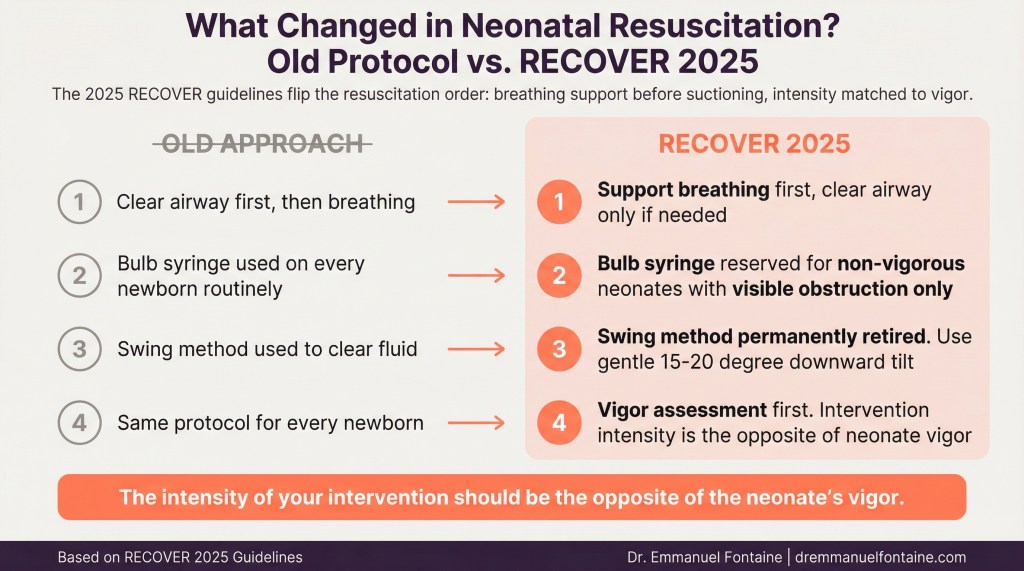
- The 2025 RECOVER guidelines flip the old resuscitation order: breathing support now comes before suctioning, not after.
- Vigorous newborns (crying, moving, pink) clear their own airways through sneezing and coughing—routine suctioning actually slows them down.
- Your first and most important tool is a warm towel, not a bulb syringe—vigorous rubbing triggers the breathing reflex more effectively than suction.
- Assessing whether a neonate is vigorous or non-vigorous within the first 60 seconds is the single most critical skill in neonatal resuscitation.
- The swing method is permanently retired due to the risk of brain hemorrhage and aspiration—use gentle gravity-assisted positioning instead.
- Whether you identify as an interventionist or naturalist breeder, evidence now determines what you do once you decide to act.
- Four visual signs—movement, breathing, color, and reflex response—give you everything you need to make the right call in seconds.
- TL;DR: Key Takeaways
- What Should Every Breeder Know About Neonatal Resuscitation?
- What Should You Do During Neonatal Resuscitation?
- What Should You Have Ready for Neonatal Resuscitation?
- What Should You Watch for During Neonatal Resuscitation?
- Breathe First, Ask Questions Later
What Should Every Breeder Know About Neonatal Resuscitation?
The Old Rule Got It Backwards
For decades, the standard approach to newborn puppy and kitten care followed a simple rule: clear the airway first. Newborns arrive with amniotic fluid (the liquid that surrounds them in the womb) in their mouths and noses. The logic seemed bulletproof—remove the fluid so the baby can breathe.
But the 2025 RECOVER guidelines revealed something critical. For healthy, vigorous newborns, suctioning actually gets in the way of lung aeration—getting air into the lungs for the very first time. Every second you spend manipulating the airway is a second that newborn isn’t breathing.
| Old Approach | New Approach (RECOVER 2025) |
| Clear airway first, then focus on breathing | Support breathing first, clear airway only if needed |
| Bulb syringe used on every newborn routinely | Bulb syringe reserved for non-vigorous neonates with visible obstruction |
| Suction seen as a safety measure | Routine suction now recognized as a potential delay to oxygenation |
| Meconium staining required deep suctioning | Immediate breathing support prioritized even with meconium staining |
Why Routine Suctioning Can Cause Harm
This was a hard lesson for me, because I had taught airway clearance as a first step for years. But the evidence behind the RECOVER update is impossible to ignore.
Routine bulb syringe use delays the first real breath by an average of 15 to 30 seconds. For a newborn whose entire body is waiting for oxygen, those seconds matter enormously. Suctioning can also trigger a vagal response (a nerve reflex that tells the heart to slow down)—at the worst possible time. And even gentle suction can cause tissue swelling in the throat that lasts 24 to 48 hours, making breathing harder during the exact window when easy breathing matters most.
| Risk of Routine Suctioning | What Happens | Why It Matters |
| Delayed first breath | Airway manipulation postpones lung aeration by 15–30 seconds | Oxygen deprivation compounds with every passing second |
| Heart rate slowing | Vagal reflex triggered by suction slows heart rate | A compromised neonate cannot afford a slower heart |
| Throat tissue swelling | Gentle suction can still irritate delicate tissues | Swelling persists 24–48 hours, making breathing harder |
The New Guiding Principle
The 2025 RECOVER guidelines boil down to one powerful idea: the intensity of your intervention should be the opposite of the neonate’s vigor. In plain language, the healthier and more active the newborn appears, the less you should do with your hands. The weaker and more limp the newborn appears, the more quickly and deliberately you need to step in.
This flips the old model on its head. Previously, many breeders (and veterinarians, including me) treated every newborn the same way—suction first, assess later. Now, the assessment comes first. Always.
| Neonate Vigor Level | Recommended Response | Primary Tool |
| Strong (crying, moving, pink) | Step back, dry gently, let physiology work | Warm towel |
| Moderate (some movement, weak cry) | Vigorous rubbing to stimulate breathing reflex | Warm towel with active stimulation |
| Weak (limp, silent, blue/pale) | Immediate intervention: stimulation, positioning, assisted breathing | Towel, positioning, mouth-to-nose ventilation |
What Should You Do During Neonatal Resuscitation?
Assess Vigor in the First 60 Seconds
This is the single most important skill in neonatal resuscitation. Everything depends on answering one question within the first minute: is this newborn vigorous or non-vigorous?
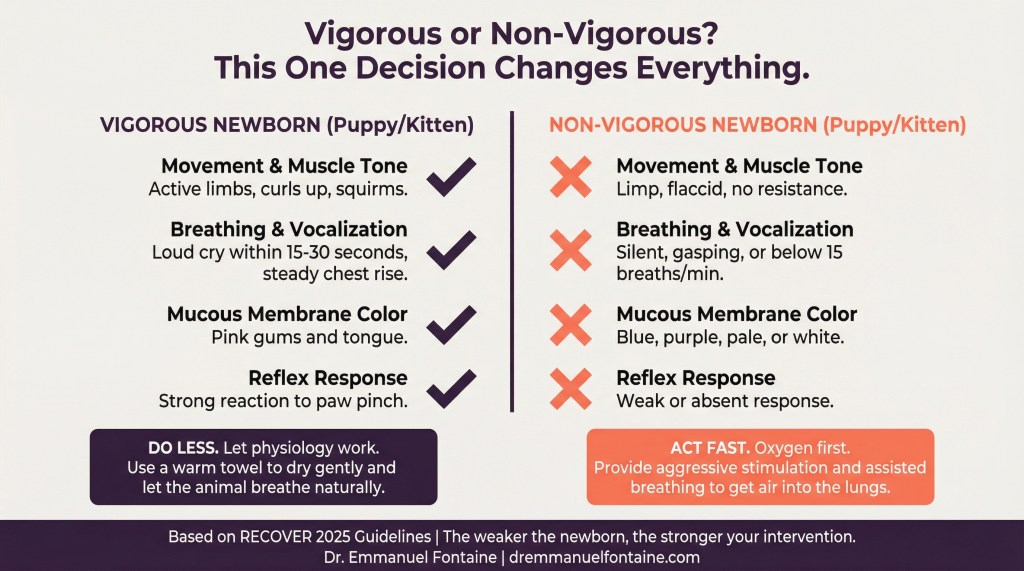
The RECOVER 2025 guidelines give you four visual signs to check. No special equipment needed—just your eyes, your hands, and your attention.
Movement and Muscle Tone: A vigorous puppy or kitten curls its legs inward, squirms, and resists your grip. A non-vigorous one feels limp—like holding a wet towel.
Breathing and Vocalization: A vigorous newborn cries loudly within 15 to 30 seconds with steady chest movement. A non-vigorous newborn is silent, gasps, or breathes fewer than 15 times per minute.
Color: Pink gums and tongue mean oxygenated blood is flowing. Blue, purple, pale grey, or white signals dangerously low oxygen.
Reflex Response: Pinch a paw pad gently. A vigorous newborn reacts strongly. A non-vigorous one barely responds.
| Vigor Sign | Vigorous (Healthy) | Non-Vigorous (Needs Help) |
| Movement and muscle tone | Active limbs, curls up, squirms when held | Limp, flaccid, no resistance when lifted |
| Breathing and vocalization | Loud crying within 15–30 seconds, steady chest rise | Silent, gasping, or breathing below 15 breaths per minute |
| Mucous membrane color | Pink gums and tongue | Blue, purple, pale, or white gums and tongue |
| Reflex response to touch | Strong reaction to paw pinch or body rub | Weak or absent response |
Follow the New Resuscitation Sequence
Once you’ve assessed vigor, the steps depend on what you found. But regardless of your breeding philosophy, the sequence follows the same evidence-based order.
For vigorous newborns: Wipe the nostrils with a warm towel. Dry the body with vigorous rubbing along the rib cage—this stimulates the breathing reflex and helps clear fluid passively. Then step back and let the puppy or kitten cry, sneeze, cough, and breathe.
For non-vigorous newborns: Start with aggressive towel rubbing along the rib cage. If there’s no improvement within 30 to 60 seconds, move to gentle mouth-to-nose ventilation—just enough pressure to see the chest rise. Only reach for the bulb syringe if you see visible fluid bubbling at the nostrils or pooling in the throat.
If there’s still no response: Veterinary support is essential. A neonate that remains unresponsive after stimulation and breathing support needs professional intervention.
| Step | For Vigorous Newborns | For Non-Vigorous Newborns |
| Step 1 | Wipe nostrils, dry body with warm towel | Vigorous towel rubbing along rib cage |
| Step 2 | Allow crying, sneezing, and natural airway clearing | If no improvement by 30–60 seconds, begin gentle mouth-to-nose ventilationyes d on |
| Step 3 | Monitor color and breathing rhythm | Suction ONLY if visible fluid obstruction is present |
| Step 4 | Place with dam for warmth and bonding | If still unresponsive, seek immediate veterinary support |
Retire Dangerous Techniques Permanently
The RECOVER 2025 guidelines are clear: the swing method is permanently retired. This practice of holding a newborn and swinging it in a downward arc to clear fluid is dangerous.
In my clinical practice, I’ve seen the consequences. The shear forces can cause intracranial hemorrhage (bleeding inside the brain). The reversed pressure can push stomach contents into the lungs. The data shows this method caused harm as often as it helped.
If you need gravity to help drain fluid (and you rarely will), hold the puppy or kitten at a slight downward angle—no more than 15 to 20 degrees. Support the head and neck at all times. This gives you the benefit of physics without the violence.
| Retired Technique | Why It’s Dangerous | Safe Alternative |
| Swing method (centrifugal arc) | Risk of brain hemorrhage from shear forces; aspiration of stomach contents | Gentle 15–20 degree downward tilt with head and neck support |
| Deep mechanical airway clearance | Tissue trauma, delayed oxygenation, heart rate slowing | Towel stimulation followed by assisted breathing if needed |
| Routine suctioning of all newborns | Delays lung aeration, causes vagal reflex, throat swelling | Reserve suction for non-vigorous neonates with visible obstruction only |
What Should You Have Ready for Neonatal Resuscitation?
Your Primary Tool: Warm, Clean Towels
This might surprise you. The most important piece of equipment in your whelping box is a stack of warm, clean towels. Not technology. Not machinery. Fabric applied with intention and skill.
When I work with breeders preparing for a litter, I always emphasize this. Vigorous rubbing with a warm towel along the rib cage stimulates the breathing reflex, promotes circulation, and clears fluid passively as the newborn moves and cries. The tactile input triggers breathing more effectively than any bulb syringe.
Keep towels warmed and within arm’s reach. Many experienced breeders I consult with keep a towel warmer right next to the whelping box.
| Towel Preparation Detail | Recommendation | Why It Matters |
| Temperature | Body-warm (not hot), pre-warmed before delivery | Prevents hypothermia while providing effective stimulation |
| Quantity | Minimum 6–8 clean towels per whelping | Each newborn needs its own dry towel; wet towels lose effectiveness |
| Texture | Slightly rough or textured fabric | Better tactile stimulation triggers stronger breathing reflex |
| Placement | Within arm’s reach of whelping area | Seconds matter—no time to search for supplies during delivery |
Backup Suction Equipment: Close But Not in Your Hand
The bulb syringe hasn’t been eliminated from neonatal care. It has been repositioned. In the old model, it was the first tool you reached for. Now, it’s an exception-only tool that stays nearby but out of your hand unless you see visible airway obstruction in a non-vigorous neonate.
Think of the bulb syringe like a fire extinguisher. You want it within arm’s reach and ready to use. But you don’t carry it around, and you don’t use it at every small flame. Keep one or two clean bulb syringes near your whelping box. Know how to use one properly—compress before inserting, release gently to create suction, never insert deep into the throat. But the key change is mental: the bulb syringe is your backup, not your default.
| Equipment | Role in RECOVER 2025 Protocol | When to Use |
| Bulb syringe | Backup tool for selective use | Only for non-vigorous neonates with visible fluid obstruction |
| Warm towels | Primary resuscitation tool | Every single delivery—vigorous and non-vigorous newborns alike |
| Clean, flat surface | Assessment and resuscitation workspace | Needed for vigor assessment and stimulation techniques |
| Clock or timer | Track critical intervention windows | To monitor the 30-second and 60-second decision points |
A Vigor Assessment Checklist You Can Use Tonight
One of the most practical things you can do right now is create a simple checklist that sits next to your whelping box. When a newborn arrives, you don’t want to rely on memory. You want the four vigor signs written down where you can see them at a glance.
In my consultations, breeders who post these signs near the whelping box make faster, more confident decisions during delivery. The stress of a whelping doesn’t leave much room for memory recall. A visual reference makes all the difference.
| Checklist Item | What to Look For | Vigorous Response | Non-Vigorous Response |
| Movement | Limb activity and muscle tone | Curling, squirming, resisting | Limp, floppy, no resistance |
| Breathing | Vocalization and chest movement | Crying within 15–30 seconds | Silent, gasping, or absent breathing |
| Color | Gum and tongue color | Pink | Blue, purple, grey, or white |
| Reflex | Response to paw pinch or body rub | Strong pull-back, grimace, louder cry | Weak or no response |
What Should You Watch for During Neonatal Resuscitation?
The 30-Second and 60-Second Decision Points
Timing is everything in neonatal resuscitation. The RECOVER 2025 guidelines identify two critical windows that shape every decision you make after delivery.
The 30-second mark is your first assessment point. By this time, a vigorous newborn should be crying, moving, and showing pink color. If these signs are absent by 30 seconds, it’s time to escalate—regardless of your breeding philosophy. An interventionist breeder might start escalating even sooner, by 20 seconds. A naturalist breeder might give a few extra seconds. But by 30 seconds, the evidence says your hands should be actively stimulating.
The 60-second mark is your critical escalation point. If a neonate is still flat, silent, and showing poor color at 60 seconds despite vigorous towel stimulation, you need to move to assisted breathing. Gentle mouth-to-nose ventilation with just enough pressure to see the chest rise. And if there’s still no improvement, veterinary support is no longer optional.
| Time Point | What You Should See | What to Do If Signs Are Absent |
| 0–15 seconds | Initial assessment begins—observe movement and breathing | Dry and stimulate with warm towel |
| 30 seconds | Crying, active movement, pink color | Escalate to vigorous rubbing; reassess continuously |
| 60 seconds | Steady breathing, strong muscle tone, good color | Begin assisted breathing (mouth-to-nose ventilation) if still non-vigorous |
| Beyond 60 seconds | Improvement with assisted breathing | Contact veterinarian immediately if no response to ventilation |
Red Flags That Demand Immediate Action
Not every complication announces itself dramatically. In my clinical experience, some of the most dangerous signs are subtle.
Persistent blue or purple color after 30 seconds of stimulation means oxygen isn’t reaching the tissues. This may indicate a heart defect, a diaphragmatic hernia (a hole in the muscle separating chest from abdomen), or severe lung immaturity.
Gasping without chest rise means the newborn is trying to breathe but air isn’t reaching the lungs. There could be a true airway obstruction or the lungs may not be inflating properly.
Heart rate below 120 beats per minute, if you can check it, signals cardiovascular failure. A healthy newborn should have a heart rate between 180 and 220 beats per minute.
| Red Flag | What It Suggests | Immediate Action |
| Persistent blue/purple color after 30 seconds of stimulation | Severe oxygen deprivation, possible structural defect | Escalate to assisted breathing; prepare for veterinary contact |
| Gasping without visible chest rise | Airway obstruction or lung failure | Gentle repositioning; consider careful suction; begin ventilation |
| Heart rate below 120 beats per minute | Cardiovascular compromise | Stimulate vigorously; begin assisted breathing; seek veterinary help |
| No improvement after 60 seconds of active intervention | Condition beyond basic resuscitation capability | Contact veterinarian immediately |
Matching Your Monitoring to Your Breeding Philosophy
Here’s where your identity as a breeder shapes how you apply these guidelines. The most successful breeders I work with—the ones with the lowest neonatal mortality—aren’t the ones who intervene the most or the least. They’re the ones who know exactly who they are and match their monitoring to their philosophy.
If you’re an interventionist breeder, your monitoring starts at second one. No cry by 20 seconds? You escalate. Non-vigorous signs by 30 seconds? You’re already moving toward emergency support. The RECOVER guidelines don’t reduce your involvement—they redirect it. Your hands are still active from the start, but now they’re rubbing, not suctioning.
If you’re a naturalist breeder, your monitoring starts with observation. All vigor signs present by 30 seconds? You step back and let the dam engage. Your restraint is now evidence-based, not just instinct-based. But when signs are absent by 30 seconds, the protocol demands your hands. Non-vigorous neonates don’t benefit from philosophy. They benefit from oxygen.
The RECOVER 2025 guidelines give both approaches the same scientific foundation. Your philosophy determines when you assess and how long you wait. The evidence determines what you do once you act.
| Breeder Philosophy | Monitoring Style | Escalation Trigger | What Stays the Same |
| Interventionist | Hands ready from second one; tight assessment windows | No cry by 20 seconds; non-vigorous signs by 30 seconds | Stimulation before suctioning; breathing support before mechanical clearance |
| Naturalist | Observation-first; allowing time for natural processes | All vigor signs absent by 30 seconds | Stimulation before suctioning; breathing support before mechanical clearance |
| Both approaches | Continuous reassessment throughout | 60 seconds without improvement triggers veterinary contact | The resuscitation hierarchy is identical once intervention begins |

Breathe First, Ask Questions Later
The RECOVER 2025 guidelines aren’t just an update to neonatal resuscitation protocols. They’re a correction. They force all of us—veterinarians and breeders alike—to confront the gap between what we were taught and what physiology actually requires.
That gap is where growth lives.
Tonight, when you look at your whelping setup, make one change. Move the bulb syringe from your hand to the shelf. Move the warm towels closer. And before your hands touch anything after a delivery, ask four questions: Is there movement? Is there breathing? Is there color? Is there reflex?
Vigorous? Step back. Let physiology work. Non-vigorous? The protocols take over—stimulation, positioning, breathing support within 60 seconds.
You now have the knowledge that the best veterinary researchers in the world published just months ago. You have a clear assessment framework. You have a resuscitation sequence backed by the latest evidence. And you have something even more powerful than any protocol: the ability to adapt, to revise what you thought you knew, and to give every newborn in your care the best possible start.
That willingness to update your knowledge—even when it contradicts what felt instinctively right—is what separates good breeders from exceptional ones. You’re already proving you have it, because you just read this entire article.
Now go set up your whelping box with confidence. Those puppies and kittens are counting on you.