🇫🇷 Lire en Français | 🇪🇸Leer en Español | 🇧🇷Leia em português
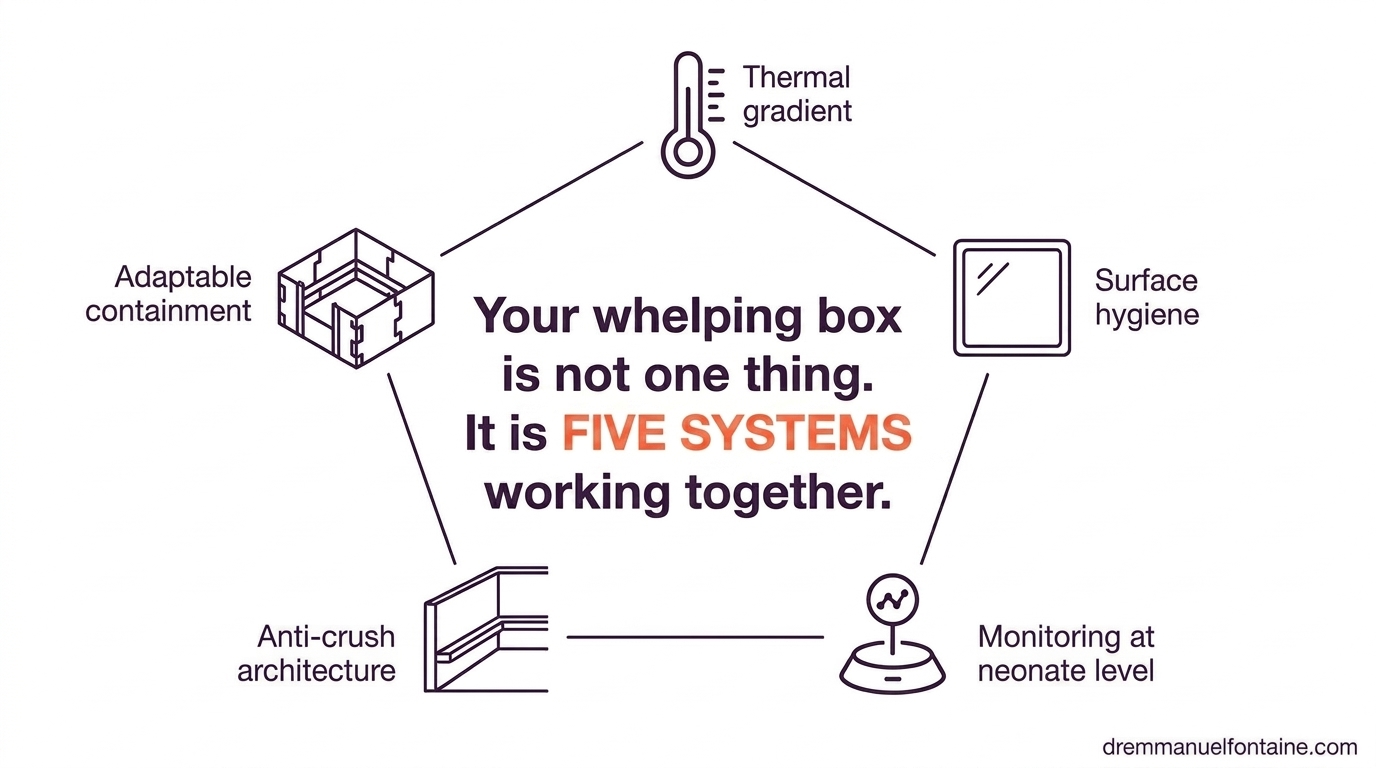
If you searched how to set up a whelping box, you already know the basics: warmth, clean bedding, room for the mother. You do not have a whelping box problem. You have a whelping system problem. Newborn puppies and kittens survive or fail on five environmental elements working together: a thermal gradient, a non-porous surface, continuous monitoring at neonate level, anti-crush architecture, and adaptable containment as the litter grows. This guide breaks down each element, gives you a 15-minute audit you can run on your existing setup, and shows you which interactions silently undo good intentions. Pair the audit with daily weighing in the first 72 hours and you have the two simplest tools that catch trouble before it becomes a litter-wide loss.
If you already know your setup needs an upgrade, the system I recommend is the EZclassic Whelping System: the engineered version of everything covered below.
- TL;DR
- The Five Elements That Must Work as One
- Why I Missed This for Twenty Years
- 1. Thermal Gradient (Not Just Warmth)
- 2. Surface Hygiene (Porous vs. Non-Porous)
- 3. Continuous Monitoring at Neonate Level
- 4. Anti-Crush Architecture
- 5. Adaptable Containment Across Litter Weeks
- Basic Whelping Box vs. System-Based Whelping Setup
- How EZwhelp Engineered the EZclassic Around These Five Interactions
- Frequently Asked Questions About Whelping Box Setup
- What temperature should a whelping box be in the first week?
- Is cardboard safe for a whelping box?
- Do I need pig rails in a whelping box?
- How big should a whelping box be?
- How do I know if my whelping box is too cold for the puppies or kittens?
- When can I move puppies or kittens out of the whelping box?
- What is the best surface for a whelping box?
- Your Next Step: Run the 5-Point Audit
TL;DR
- Most breeders do not have a whelping box problem. They have a whelping system problem.
- Five environmental elements decide neonatal survival in the first 72 hours: thermal gradient, surface hygiene, monitoring at neonate level, anti-crush architecture, adaptable containment.
- Each element interacts with the others. Fixing one in isolation can quietly break another.
- A 15-minute, 5-point audit of your existing setup will reveal whether your elements work together or against each other.
- If your audit flags more than one weak point, an engineered system like the EZclassic Whelping System addresses the interactions in one piece of hardware (10% off through my link).
The Five Elements That Must Work as One
Neonatal mortality in dogs and cats is rarely caused by a single failure. It is caused by a chain of small interactions that turn one weak point into a litter-wide problem. A heat source that solves cold can create infection if it sits over wood. A clean box can stress a mother if she has no cooler zone to retreat to. A wall thermometer that reads 24 C (75 F) in a heated room (the typical reading in most breeder setups) can hide the 20 C (68 F) or less that the puppies or kittens are actually feeling on the floor. That is a full 10 C (18 F) below the week-one warm-zone target.
Most whelping content treats these elements separately. This guide treats them as a system. Below is the 5-element framework at a glance. Each section that follows walks through one element with the underlying science, the failure mode you are trying to avoid, and the audit step you can run in your own kennel or cattery. The principles cover both species, because the first 72 hours shape the same critical windows in puppies and kittens. If you want the full background on whelping box design before going element by element, the deep dive sits in my existing guide: How to Make a Whelping Box for Newborn Puppies and Kittens.
| Element | What It Means | Audit Step |
|---|---|---|
| 1. Thermal gradient | Warm zone for neonates, cool zone for the mother. Not uniform heat. | Place two thermometers at neonate level and compare warm side vs. cool side. |
| 2. Surface hygiene | Non-porous flooring that does not absorb birth fluids, urine, or milk. | Pour a tablespoon of water on the surface; wait 5 minutes; check absorption. |
| 3. Continuous monitoring | Temperature read where the neonates lie, not on the wall. | Compare a wall thermometer reading to a floor-level reading at the same moment. |
| 4. Anti-crush architecture | Pig rails or protected zones the mother cannot fully cover. | With the mother lying down, can a neonate reach a protected wall zone? |
| 5. Adaptable containment | Sizing that adjusts as the litter moves from week 1 to week 6. | Map your box to the litter’s likely size at week 1, week 3, and week 6. |
Why I Missed This for Twenty Years
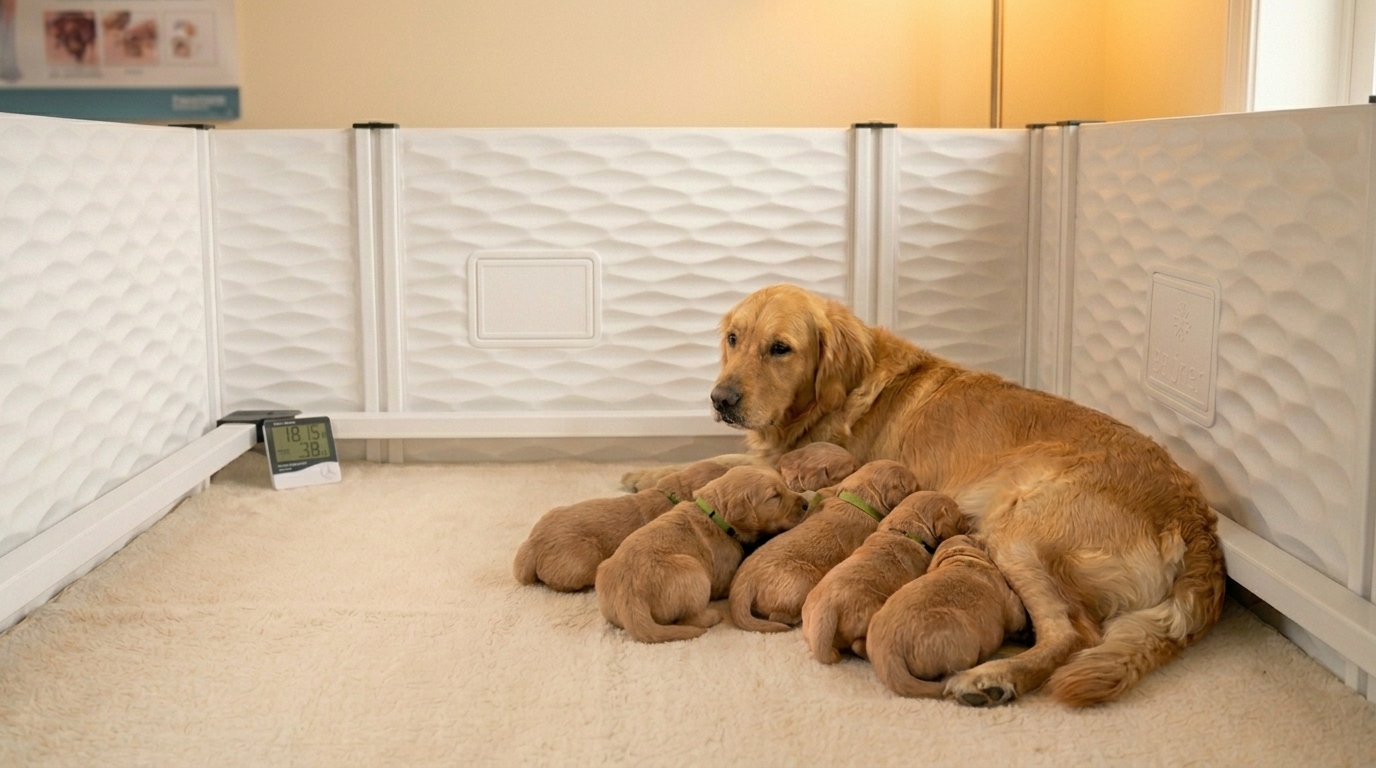
I lost five puppies from my first litter. Nine born, five dead within 48 hours. I was a vet student in France. My girlfriend’s dog had just delivered. The mother was settled and nursing. The litter looked normal.
The whelping box was a cardboard box placed next to a stone wall. Beginning of March. Stone walls in old houses hold cold the way a battery holds charge. That wall was pulling heat out of the box all night. For twenty years, I told this story as a lesson about hypothermia. I was not wrong. Those puppies died because they got cold, and once a neonate is unresponsive from hypothermia, the resuscitation window is short. But I was not complete.
That cardboard box did not fail on temperature alone. It failed on everything, all at once. Cardboard absorbs fluid and breeds bacteria within hours. There were no rails to prevent the mother from lying on a cold, sluggish neonate. There was no monitoring at puppy level. There was no gradient: the entire box was the same temperature, which meant the mother was either too hot or the puppies were too cold. Five things failed simultaneously, and that is the part I missed for years. Each element was a separate lecture in my head. They are not separate. They are one system.
1. Thermal Gradient (Not Just Warmth)
The science
Newborn puppies and kittens cannot regulate their body temperature in the first 2 to 3 weeks of life. Their thermoregulatory reflexes mature gradually, which means environmental temperature is their physiology. Below roughly 34 C (93 F) rectal, a neonate stops digesting milk and begins a cascade that ends in hypoglycemia, dehydration, and death. The risk window is real and narrow. Thermal management also sits at the center of canine herpes virus prevention: CHV-1 replicates aggressively below 37 C (98.6 F) at neonatal core temperature, which makes the whelping box thermal target part of an antiviral strategy as much as a comfort one.
The mother is on the opposite end of the curve. She is fully thermoregulating, post-partum, and producing heat. She needs a place where she can step out of the warm zone and cool down. The solution is not more uniform heat. It is a gradient: a warm side for the neonates and a cooler side for the mother. The gradient eliminates the tradeoff. This becomes even more important when you remember that the last 6 weeks of pregnancy are an active programming window: a mother whose post-partum environment is uncomfortable is a mother whose stress signal reaches the litter.
The failure mode
Uniform heat plus a wall thermometer reading. A breeder warms the room. The wall thermometer reads 21 to 24 C (70 to 75 F). That looks like a safe nursery temperature to her. At neonate level, the actual reading is 20 C (68 F) or less, and the warm side and cool side are identical because no gradient was engineered. The mother becomes restless when she gets too warm, repositions aggressively, and a neonate gets pinned. She thought she had solved the thermal problem. She had not, and she had also created a crushing problem.
The audit step
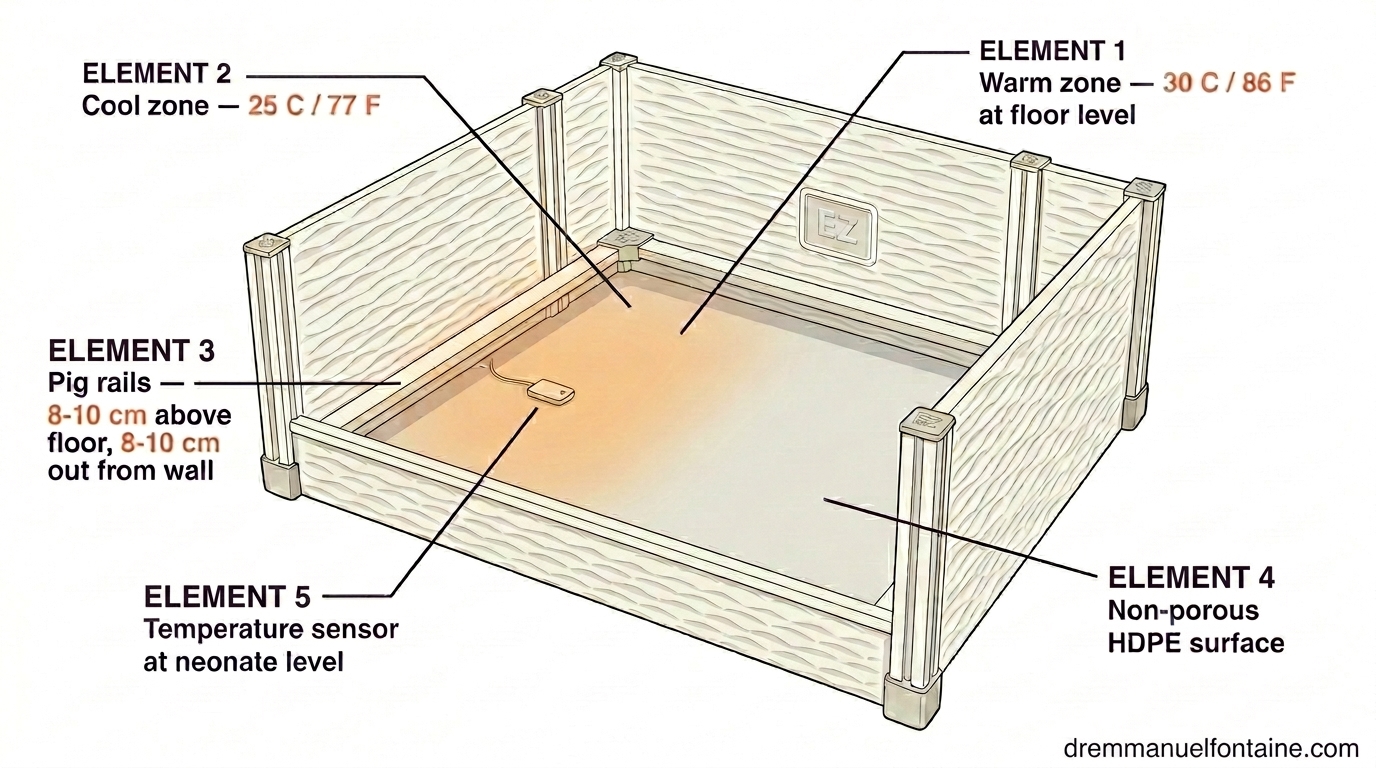
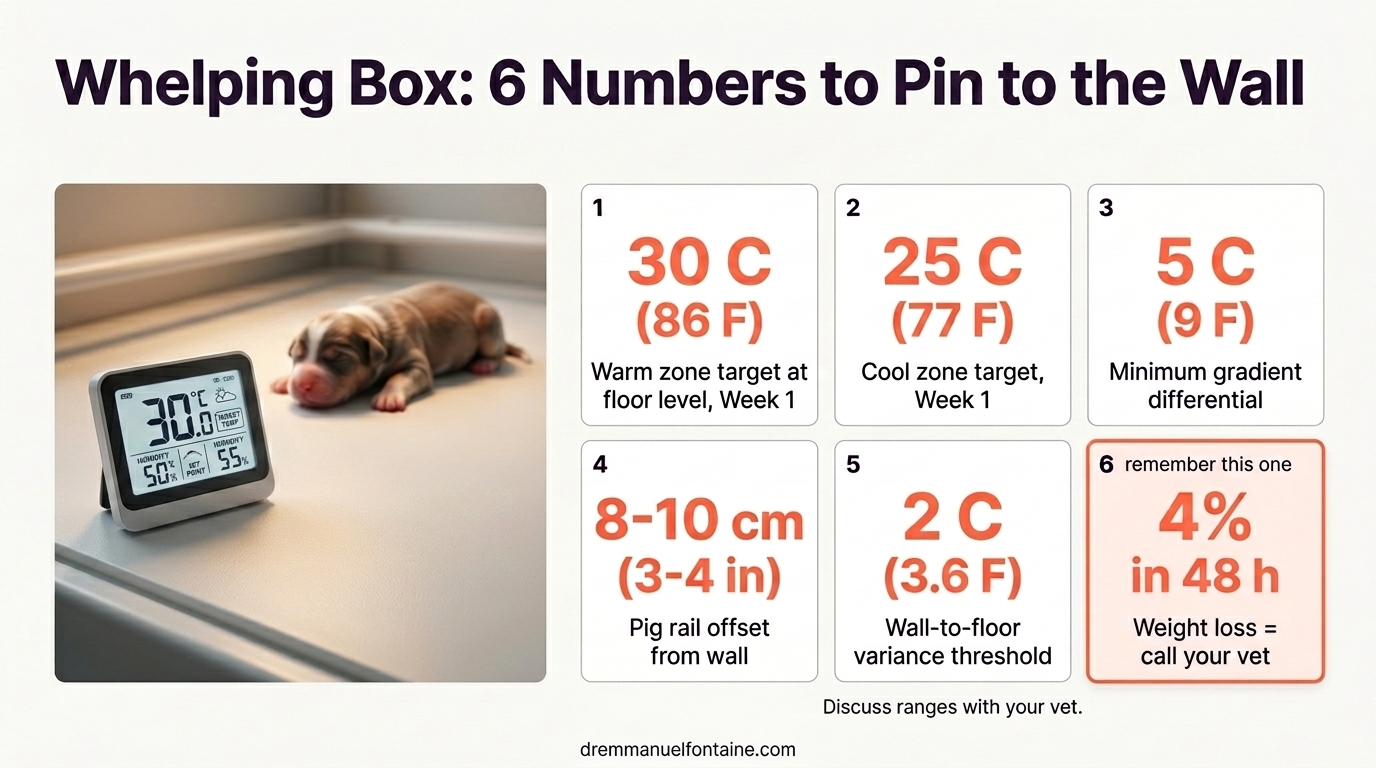
Audit 1: The gradient test. Place two thermometers in your whelping area: one on the warm side at neonate level (on the floor surface, under bedding), one on the cool side. Warm side should read 30 C (86 F) for week one. Cool side should be at least 5 C (9 F) lower. If both read the same, you have uniform heat, not a gradient. Three minutes, decisive answer.
| Litter age | Warm zone target | Cool zone target | Differential |
|---|---|---|---|
| Week 1 | 30 C (86 F) at floor level | 25 C (77 F) | 5 C (9 F) lower |
| Week 2 | 28 C (82 F) at floor level | 23 C (73 F) | 5 C (9 F) lower |
| Week 3 | 26 C (79 F) at floor level | 21 C (70 F) | 5 C (9 F) lower |
| Week 4 onward | Room temperature acceptable; supplemental heat as needed | Room temperature | Gradient becomes optional once neonates thermoregulate |
2. Surface Hygiene (Porous vs. Non-Porous)
The science
A whelping box accumulates fluid fast. Birth fluids on day one. Urine and meconium in the first 48 hours. Milk, regurgitation, mild diarrhea over the next weeks. The surface beneath the bedding either holds these fluids or sheds them. Wood, cardboard, and fabric all absorb. Porous absorption plus warmth equals a bacterial culture in the 24 to 48 hours following absorption. The very feature that solves the temperature problem now feeds the next problem. This is also why c-section litters need extra microbial seeding support: a c-section pup or kitten arrives without the vaginal microbial bath, and a contaminated box fills that gap with the wrong bacteria.
Non-porous high-density polyethylene, sealed plastic, or coated panels do not absorb. They wipe clean. They do not turn warm bedding into a damp incubator. This is the difference between a clean box on day one and a clean box on day ten.
The failure mode
A heat pad over a wooden platform. Within 24 hours, that warm, damp wood is colonized. The breeder kept everything clean visually. The bedding was changed daily. But the structural surface beneath the bedding was already a bacterial reservoir, and the bedding became re-contaminated within hours of each change. The thermal solution created the hygiene problem.
The audit step
Audit 2: The surface test. Pour a tablespoon of water on your whelping surface. Wait 5 minutes. If the water is absorbed, or the surface stays damp, the surface is porous. Porous plus warmth is a hygiene problem within hours. This is true even if you cannot see or smell anything. Bacteria do not need to look dirty to be there.
| Surface material | Porosity | Whelping verdict |
|---|---|---|
| Cardboard | Highly porous | Not safe beyond a single short use. Discard before contamination compounds. |
| Untreated wood | Porous | Not recommended. Will absorb birth fluids and harbor bacteria. |
| Sealed/coated wood (marine grade) | Low porosity | Acceptable if joints are sealed and no raw edges remain. |
| High-density polyethylene (HDPE) | Non-porous | Recommended. Wipes clean, holds no fluid, holds heat. |
| Stainless steel pan | Non-porous | Acceptable but cold-conductive. Pair with insulating bedding. |
| Vet vinyl mats | Non-porous | Acceptable as a layer over a porous base, not as the structural surface. |
3. Continuous Monitoring at Neonate Level
The science
Air temperature stratifies. Warm air rises, cool air sinks, surfaces conduct heat away from what touches them. A wall thermometer mounted at adult dog height (around 40 cm / 16 in above the floor) is reading the wrong layer of air. The puppies and kittens are not in that layer. They are on the floor, against bedding, often piled together. The temperature they are experiencing is rarely the temperature you are reading.
Continuous monitoring matters because the box does not stay still. The mother enters and leaves. Doors open. Drafts move. The heat source cycles. The temperature at neonate level can swing 3 to 5 C (5 to 9 F) within an hour and you would not know it from a wall reading.
The failure mode
Trusting the wrong number. A wall thermometer reads 24 C (75 F). The breeder logs it. The breeder relaxes. At neonate level, the actual temperature is 20 C (68 F) or less, which is at least 10 C (18 F) below the week-one warm-zone target of 30 C (86 F). The data was there. The data was wrong. And because the breeder trusted the number, she did not check. By the time a neonate is visibly chilled, the cascade is already moving.
The audit step
Audit 3: The monitoring height test. Place your thermometer where the neonates actually lie, not on the wall. Compare that reading to your wall thermometer. Pair this with daily weighing to catch trouble before clinical signs appear. If the difference between your wall reading and your floor reading is more than 2 C (3.6 F), your monitoring has been giving you the wrong number, and your daily logs are calibrated to the wrong reference point.
| Reading location | Typical air temperature | What it tells you |
|---|---|---|
| Wall, 40 cm (16 in) above floor | Highest reading in the box | Room comfort, not neonate comfort. |
| Adult dog chest height | Mid-range | Mother’s comfort. Useful only as a cool-zone proxy. |
| Floor surface, under bedding | Lowest reading in the box | The number that matters. Use this for week-one targets. |
| Inside the puppy or kitten pile | Variable, often elevated | Microenvironment created by neonates clustering. Not a substitute for floor reading. |
4. Anti-Crush Architecture
The science
In the first 7 to 10 days, neonates cannot move fast enough to escape a repositioning mother. They locate by warmth and smell, they crawl in centimeters per minute, and they cluster against walls and against each other. A mother does not crush her litter out of carelessness. She crushes when there is nowhere safe for a neonate to be when she lies down, and she repositions more often when she is uncomfortable: an un-managed pain load in the dam is a hidden crushing risk most breeders never connect to the box design itself.
Pig rails create that escape zone. They are mounted 8 to 10 cm (3 to 4 in) above the floor and 8 to 10 cm (3 to 4 in) out from the wall, leaving a protected channel along the perimeter that the mother cannot fully cover when she lies on her side. A neonate that rolls under a rail is in a zone the mother’s body cannot pin to the floor. Crushing prevention is architectural, not behavioral. A vigilant breeder cannot watch the box every minute of every night. Rails can. The same design logic applies to queens, where recognizing distress in the cat at the right moment turns into the same architectural conversation once the kittens are out of the queen and into their first hours of life.
The failure mode
Relying on observation alone. The breeder is in the room. The breeder is awake. A neonate is still pinned for 30 to 60 seconds before the breeder reaches in. Time to permanent injury or death is shorter than time to manual rescue. This is the failure that feels preventable in hindsight and is not preventable in the moment.
The audit step
Audit 4: The rail check. With the mother in the box, can a neonate reach a protected zone along any wall? If the mother can cover the entire floor when lying down, there is no escape route. Do this audit with the actual mother in the actual box, not theoretically. A heavily pregnant Great Dane and a heavily pregnant Norwegian Forest Cat occupy very different footprints, and your rail spec needs to match her.
| Mother weight category | Rail height above floor | Rail offset from wall | Note |
|---|---|---|---|
| Cat (small) and toy dogs (under 5 kg / 11 lb) | 5 to 7 cm (2 to 3 in) | 5 to 7 cm (2 to 3 in) | Smaller channel; queen needs less clearance. |
| Small to medium dog (5 to 25 kg / 11 to 55 lb) | 8 to 10 cm (3 to 4 in) | 8 to 10 cm (3 to 4 in) | Most common configuration for the majority of dog breeders. |
| Large dog (25 to 50 kg / 55 to 110 lb) | 10 to 12 cm (4 to 5 in) | 10 to 12 cm (4 to 5 in) | Wider channel to accommodate the mother’s flank. |
| Giant dog (over 50 kg / 110 lb) | 12 to 15 cm (5 to 6 in) | 12 to 15 cm (5 to 6 in) | Reassess weekly; her lying-down footprint can grow further into lactation. |
5. Adaptable Containment Across Litter Weeks
The science
A whelping box is not one box. It is three boxes in sequence. Week one needs tight, warm containment so neonates cannot wander out of the heat zone. Week three needs space for movement and the first awkward steps. By the start of the weaning window, the litter needs a play and elimination zone separate from the sleeping area, plus an exit the mother can use freely while neonates stay contained.
For week one specifically, the rule I have used with breeders for years is the 1.5x to 2x nose-to-tail rule: measure your dam from the tip of the nose to the base of the tail, then multiply by 1.5 to 2 for both length and width. That sizing keeps the mother able to stretch out fully while keeping the litter inside a tight, warm microenvironment. Oversized is not safer. A box that is too big lets neonates stray away from the heat source and the mother, and hypothermia develops faster than most breeders realize.
A fixed-size box compromises on every stage. Sized for week one, it cramps the litter by week three. Sized for week six, it lets neonates escape the warm zone in week one. Adaptability is a design choice, not a luxury. It also matters for kittens, where transitional feeding routines start before the kittens are mature enough to leave the queening box on their own.
The failure mode
One box for the whole litter cycle. The breeder buys a single fixed-size whelping box. By week three, the puppies or kittens are climbing out, eliminating in the sleeping area, or piling against the heat source they no longer need. The box stops serving them and the breeder starts compensating with workarounds (towels, cardboard barriers, blocked openings). The system is now improvised. Improvisation is where small mistakes happen.
The audit step
Audit 5: The week-by-week map. On paper, sketch what your box needs to do at week 1, week 3, and week 6. Floor area. Wall height. Door position. Heat zone. Elimination zone. If the same fixed configuration tries to serve all three, list the workaround you will be forced into for each transition. Workaround count is your audit score. Zero is best.
| Week | Floor area target (interior of the box) | Wall height | What changes |
|---|---|---|---|
| Week 1 | Apply the 1.5x to 2x nose-to-tail rule. Typical brackets: cat or toy dog 0.25 to 0.74 m^2 (3 to 8 ft^2), small to medium dog 0.5 to 1.5 m^2 (5 to 16 ft^2), large dog 0.9 to 2.4 m^2 (10 to 25 ft^2), giant dog 1.2 to 3.9 m^2 (13 to 42 ft^2). | 30 to 40 cm (12 to 16 in) | Warm zone dominant. Neonates contained tight against the heat source. Oversized is not safer here: a box too big lets the litter stray from the warm zone. |
| Week 3 | About 1.5 to 2x the week-1 area (often by adding a side panel rather than starting over). | 30 to 50 cm (12 to 20 in) | First exploration. Need a defined sleeping zone vs. moving zone. |
| Week 6 | About 3 to 4x the week-1 area (consider an attached run rather than a single oversized box). | Higher, with a step-over door for the mother | Elimination zone separate from sleeping zone. Mother needs free exit. |
Basic Whelping Box vs. System-Based Whelping Setup
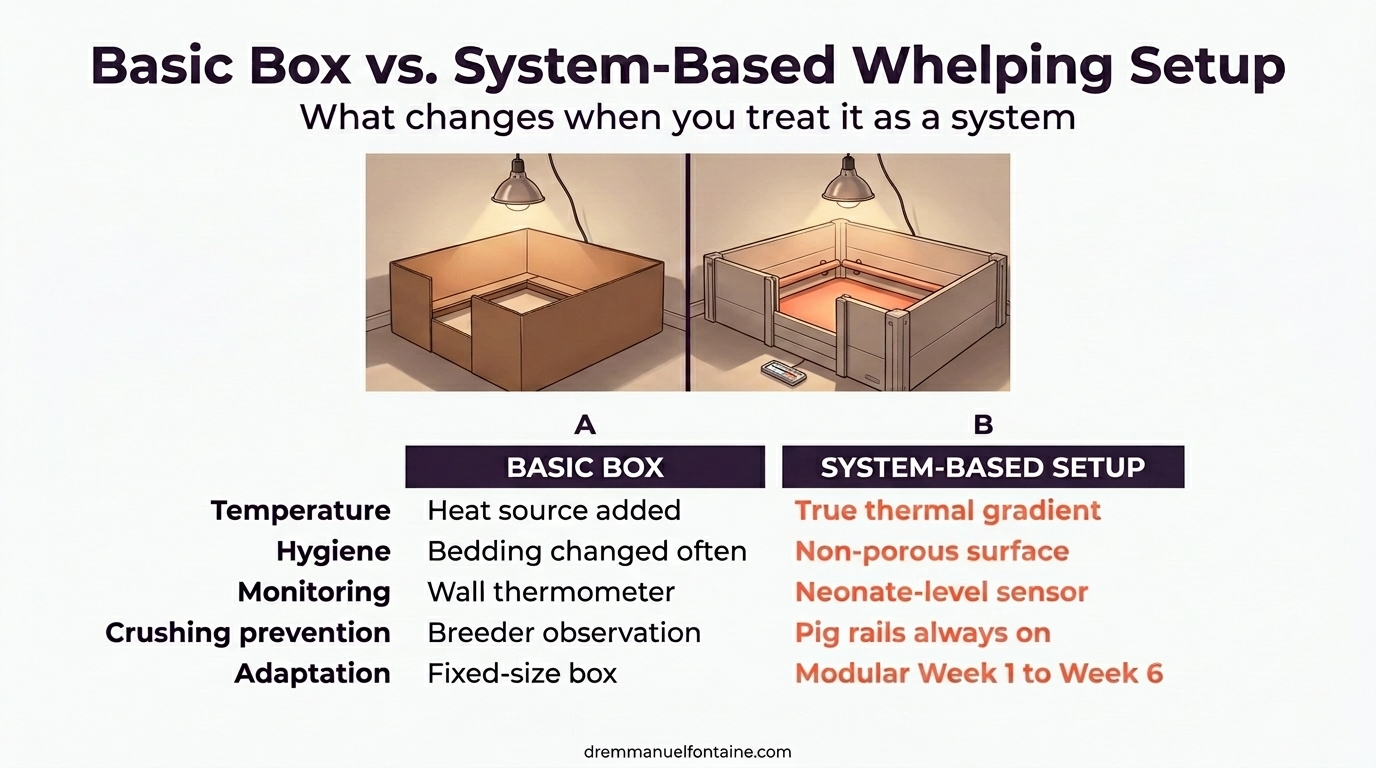
Most breeders are not starting from zero. They have a setup that addresses some of the five elements. The question is whether that setup leaves their elements working with each other or against each other. This is the lens I used when evaluating the EZclassic Whelping System.
| Feature | Basic whelping box | System-based whelping setup |
|---|---|---|
| Temperature | Heat source added | True thermal gradient (warm zone for neonates, cool zone for mother) |
| Hygiene | Bedding changed often | Non-porous surface that does not absorb fluid |
| Monitoring | Wall thermometer | Neonate-level monitoring, ideally continuous |
| Crushing prevention | Breeder observation | Pig rails or protected zones at all times |
| Growth adaptation | Fixed-size box | Modular containment that adapts week 1 to week 6 |
If your current setup matches the left column on more than one row, this is exactly why I evaluated the EZclassic Whelping System. The five elements are addressed in one piece of hardware, not five workarounds.
How EZwhelp Engineered the EZclassic Around These Five Interactions
Affiliate disclosure: this blog includes a paid partnership with EZwhelp. I earn a commission on purchases through my link, at no extra cost to you. I only partner with products I have evaluated and believe genuinely serve the breeding community.
I have been teaching the five elements above for twenty years. What I rarely found was a product designed around the interactions between them. Most whelping setups solve one or two problems well and create new ones in the process. Heat without gradient. Hygiene without anti-crush. Monitoring without continuity.
When I evaluated the EZclassic against these five criteria, it was the first commercial system I found where the engineering decisions reflected the same systems thinking I teach. Below is how the hardware maps to each element. You can absolutely build a setup that addresses all five elements yourself. Where the EZclassic changed my thinking was in how the elements are engineered to support each other rather than create new tradeoffs.
| System element | EZclassic engineering choice | What it solves |
|---|---|---|
| 1. Thermal gradient | Modular sizing (71, 96, 122 cm / 28, 38, 48 in panels) creates floor space for a real gradient with their heat pad system | Warm zone on one side, cool zone for the mother on the other. No tradeoff. |
| 2. Surface hygiene | Non-porous high-density polyethylene panels | Thermal environment does not become a hygiene problem. |
| 3. Continuous monitoring | Smart WiFi monitoring at neonate level | Reads where the puppies and kittens actually are, not where you mounted a wall thermometer. |
| 4. Anti-crush architecture | Pig rail kit mounts to the panels | Anti-crush and gradient coexist instead of competing for floor space. |
| 5. Adaptable containment | Add-on rooms and adjustable door panels | System adapts as the litter grows from week 1 through week 6+. |
See how EZwhelp engineered the EZclassic around these five interactions: 10% off automatically through this link. No code needed. It applies at checkout.
EZwhelp extends the 10% discount on the entire order to anyone who purchases through this link, as a thank-you for being part of this community. The genetics you have spent years building deserve an environment engineered to match.
Frequently Asked Questions About Whelping Box Setup
What temperature should a whelping box be in the first week?
30 C (86 F) at floor level on the warm side, with a cool zone 5 C (9 F) lower for the mother. The number breeders most often miss is that the target is at floor level, not air temperature read on the wall. A wall thermometer in a typical heated nursery reads 21 to 24 C (70 to 75 F) while the floor reading underneath the bedding can sit at 20 C (68 F) or less, which is more than 10 C below target.
Is cardboard safe for a whelping box?
Not as a structural surface. Cardboard is highly porous and absorbs birth fluids, urine, and milk within hours. In a warm box, the absorbed fluid becomes a bacterial culture. Cardboard is acceptable as a single-litter, short-use disposable layer with a non-porous base underneath, but it is not the box itself. Plan for HDPE, sealed wood, or a stainless pan as your structural floor.
Do I need pig rails in a whelping box?
Yes, in almost every case. Pig rails create a protected channel along the perimeter that the mother cannot fully cover when she lies down. Without them, the warmest spot in the box (where neonates cluster) is also the most dangerous spot. Anti-crush prevention is architectural, not behavioral. A vigilant breeder cannot watch the box every minute. Rails can. The exception is some queening boxes for very small queens, but even there, a low-profile rail is usually preferable to none. The EZclassic system addresses this with a pig rail kit that mounts directly to the panels, so anti-crush protection and the thermal gradient share the same floor space rather than competing for it.
How big should a whelping box be?
Big enough to do three jobs in sequence: tight containment near the heat source in week one, expanded movement space by week three, and a separate elimination zone with a step-over exit for the mother by week six. A fixed-size box that fits week one will be too small by week three, and a box that fits week six will let neonates wander out of the warm zone in week one. Modular or expandable systems solve this. If you go fixed-size, size for week three and plan for an attached pen by week five.
How do I know if my whelping box is too cold for the puppies or kittens?
Three signals before clinical signs appear. Floor-level temperature reads more than 2 C (3.6 F) below your warm-zone target. Neonates pile aggressively and cry at the periphery of the pile. Daily weights flag the 4% loss in 48 hours rule. The earliest objective signal is the floor thermometer; the earliest behavioral signal is pile behavior; the earliest physiological signal is the daily weight curve. Catching one of the three early gives you hours before a neonate is in trouble. The same first-24-hour stakes also drive colostrum intake and passive transfer, which is why early thermal failure and early colostrum failure so often appear together.
When can I move puppies or kittens out of the whelping box?
Functionally, week 4 to 5 for puppies and week 4 to 6 for kittens, when thermoregulation is established and the litter is exploring beyond the sleeping zone. Practically, the move is gradual: an attached pen first, then a larger room, then weaning into the breeder’s broader living space. The box is not a destination. It is a graduated environment. Many breeders also use this transition to introduce the first solid feeds for puppies in a defined feeding zone separate from the sleeping zone.
What is the best surface for a whelping box?
Non-porous, easily wiped, holds no fluid. That rules out cardboard, untreated wood, and fabric as structural surfaces. Stainless steel pans work but conduct cold and need an insulating bedding layer. Sealed marine-grade wood is acceptable if every joint is sealed. Non-porous high-density polyethylene panels (the material the EZclassic uses) solve this without the hygiene tradeoff that warm bedding over a porous base creates.
If you want to bring a marked-up audit to your next pre-whelping consult, do it as a clarification conversation, not a system-design conversation. Whelping environment design is something you have all the framework for in this guide. Use the consult time for the case-specific questions only your vet can answer about your particular dam, breed, season, and history.
Your Next Step: Run the 5-Point Audit
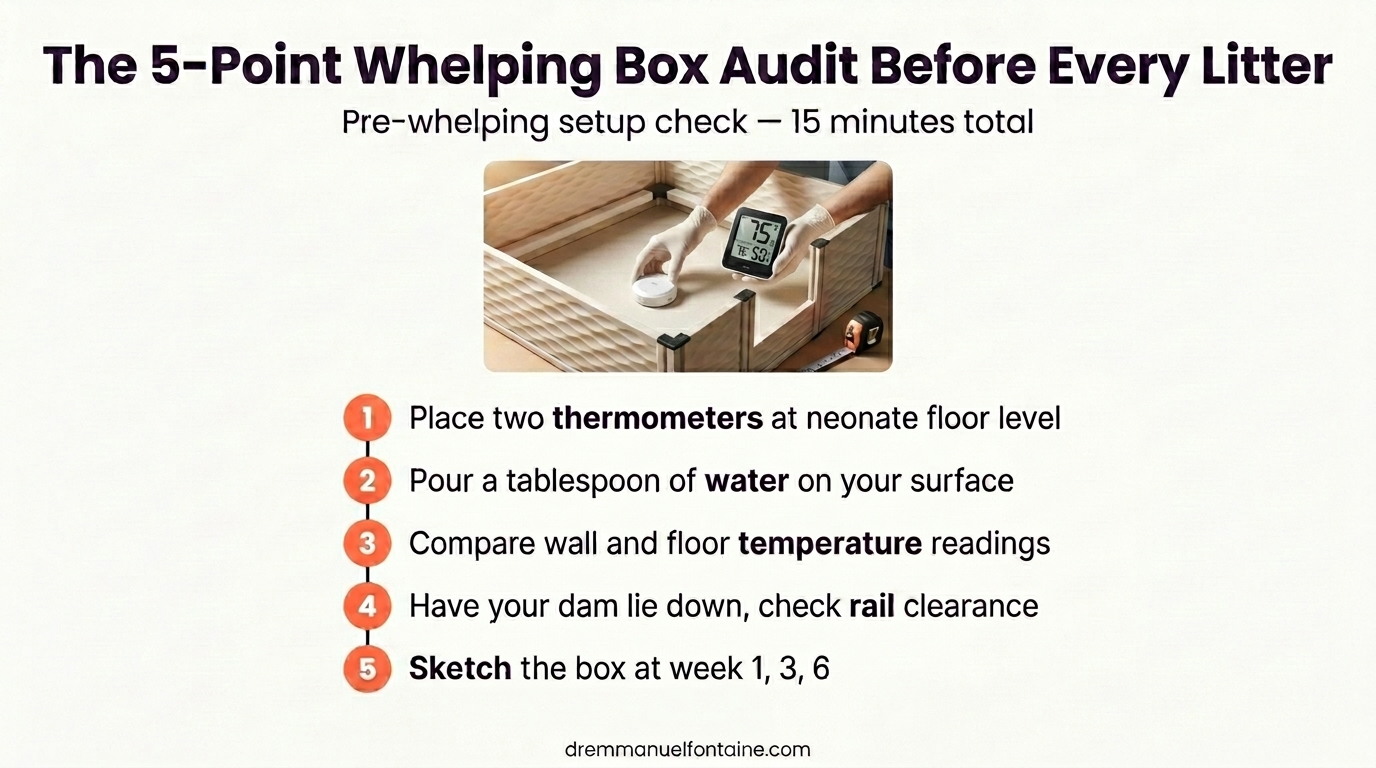
Before your next litter, run all five audits on your current setup. It takes fifteen minutes. Two thermometers, a tablespoon of water, a tape measure, the actual mother in the actual box, and a sketch of what the box needs to do at week 1, week 3, and week 6. Score yourself out of five. Anything you fail is a real interaction risk you can fix before the litter arrives.
| # | Audit | Pass criterion |
|---|---|---|
| 1 | The gradient test | Warm zone reads 30 C (86 F) at floor level; cool zone reads at least 5 C (9 F) lower. |
| 2 | The surface test | A tablespoon of water is not absorbed within 5 minutes. |
| 3 | The monitoring height test | Wall reading and floor reading differ by less than 2 C (3.6 F), OR you have moved your sensor to floor level. |
| 4 | The rail check | With the mother lying down, a neonate can reach a protected wall zone the mother cannot pin. |
| 5 | The week-by-week map | Box configuration adapts to week 1, week 3, and week 6 with zero workarounds. |
If your audit fails two or more points, you are not fixing one problem. You are rebuilding the system. That is the moment an engineered setup like the EZclassic makes the most sense, because the five elements are designed to support each other instead of each fix becoming a workaround for the last one.
If you only do one thing this week, run Audit 1, the gradient test. It takes three minutes and reveals more about your setup than any single piece of equipment you could buy. And if you decide your setup needs an upgrade, my EZwhelp link gives you 10% off automatically. No code. It applies at checkout.
Affiliate disclosure: this blog includes a paid partnership with EZwhelp. I earn a commission on purchases through my link, at no extra cost to you. I only partner with products I have evaluated and believe genuinely serve the breeding community.

